> ## Documentation Index
> Fetch the complete documentation index at: https://docs.flowla.com/llms.txt
> Use this file to discover all available pages before exploring further.
# 3️⃣ Automate with workflows & AI
> Build your first workflow to automate follow-ups, room creation, and team notifications.
### Why use workflows
Workflows automate the steps you repeat every day, like sending follow-ups, unlocking rooms, or notifying your team. In just a few clicks, you can build your first Flowla workflow and start scaling without the manual work.
In this guide, you'll build a simple, automated workflow that:
* Listens for a trigger (like a form submission or deal stage change)
* Runs one or more actions (like sending an email, adding content to a room, or posting to Slack)
* Optionally adds an AI Agent to generate content for you
If your workflow uses AI Agents to generate content, route it through [Smart Queue](/automations/smart-queue) so you can review the output before it goes live to customers.
### Before you start: Make sure integrations are live
If your workflow uses:
* A **CRM trigger** (e.g. HubSpot or Salesforce)
* An **email action** (e.g. Gmail or Outlook)
* Or pulls data from **call transcripts**
You'll need to connect those integrations first. Go to **Integrations** in Flowla and follow the setup instructions.
### Example workflows
* **Auto-create rooms** when deals reach specific stages in your CRM
* **Manipulate rooms based on CRM triggers** Update your room based on changes in CRM.
* **Update CRM based on room triggers** Automate processes in your CRM when something happens inside your room.
* **Send follow-up emails** when rooms are viewed (or not viewed)
* **Unlock sections** based on form submissions or task completions
* **Notify your team** when key engagement happens
Browse pre-built workflow templates in [Suggested Recipes](/automations/suggested-recipes).
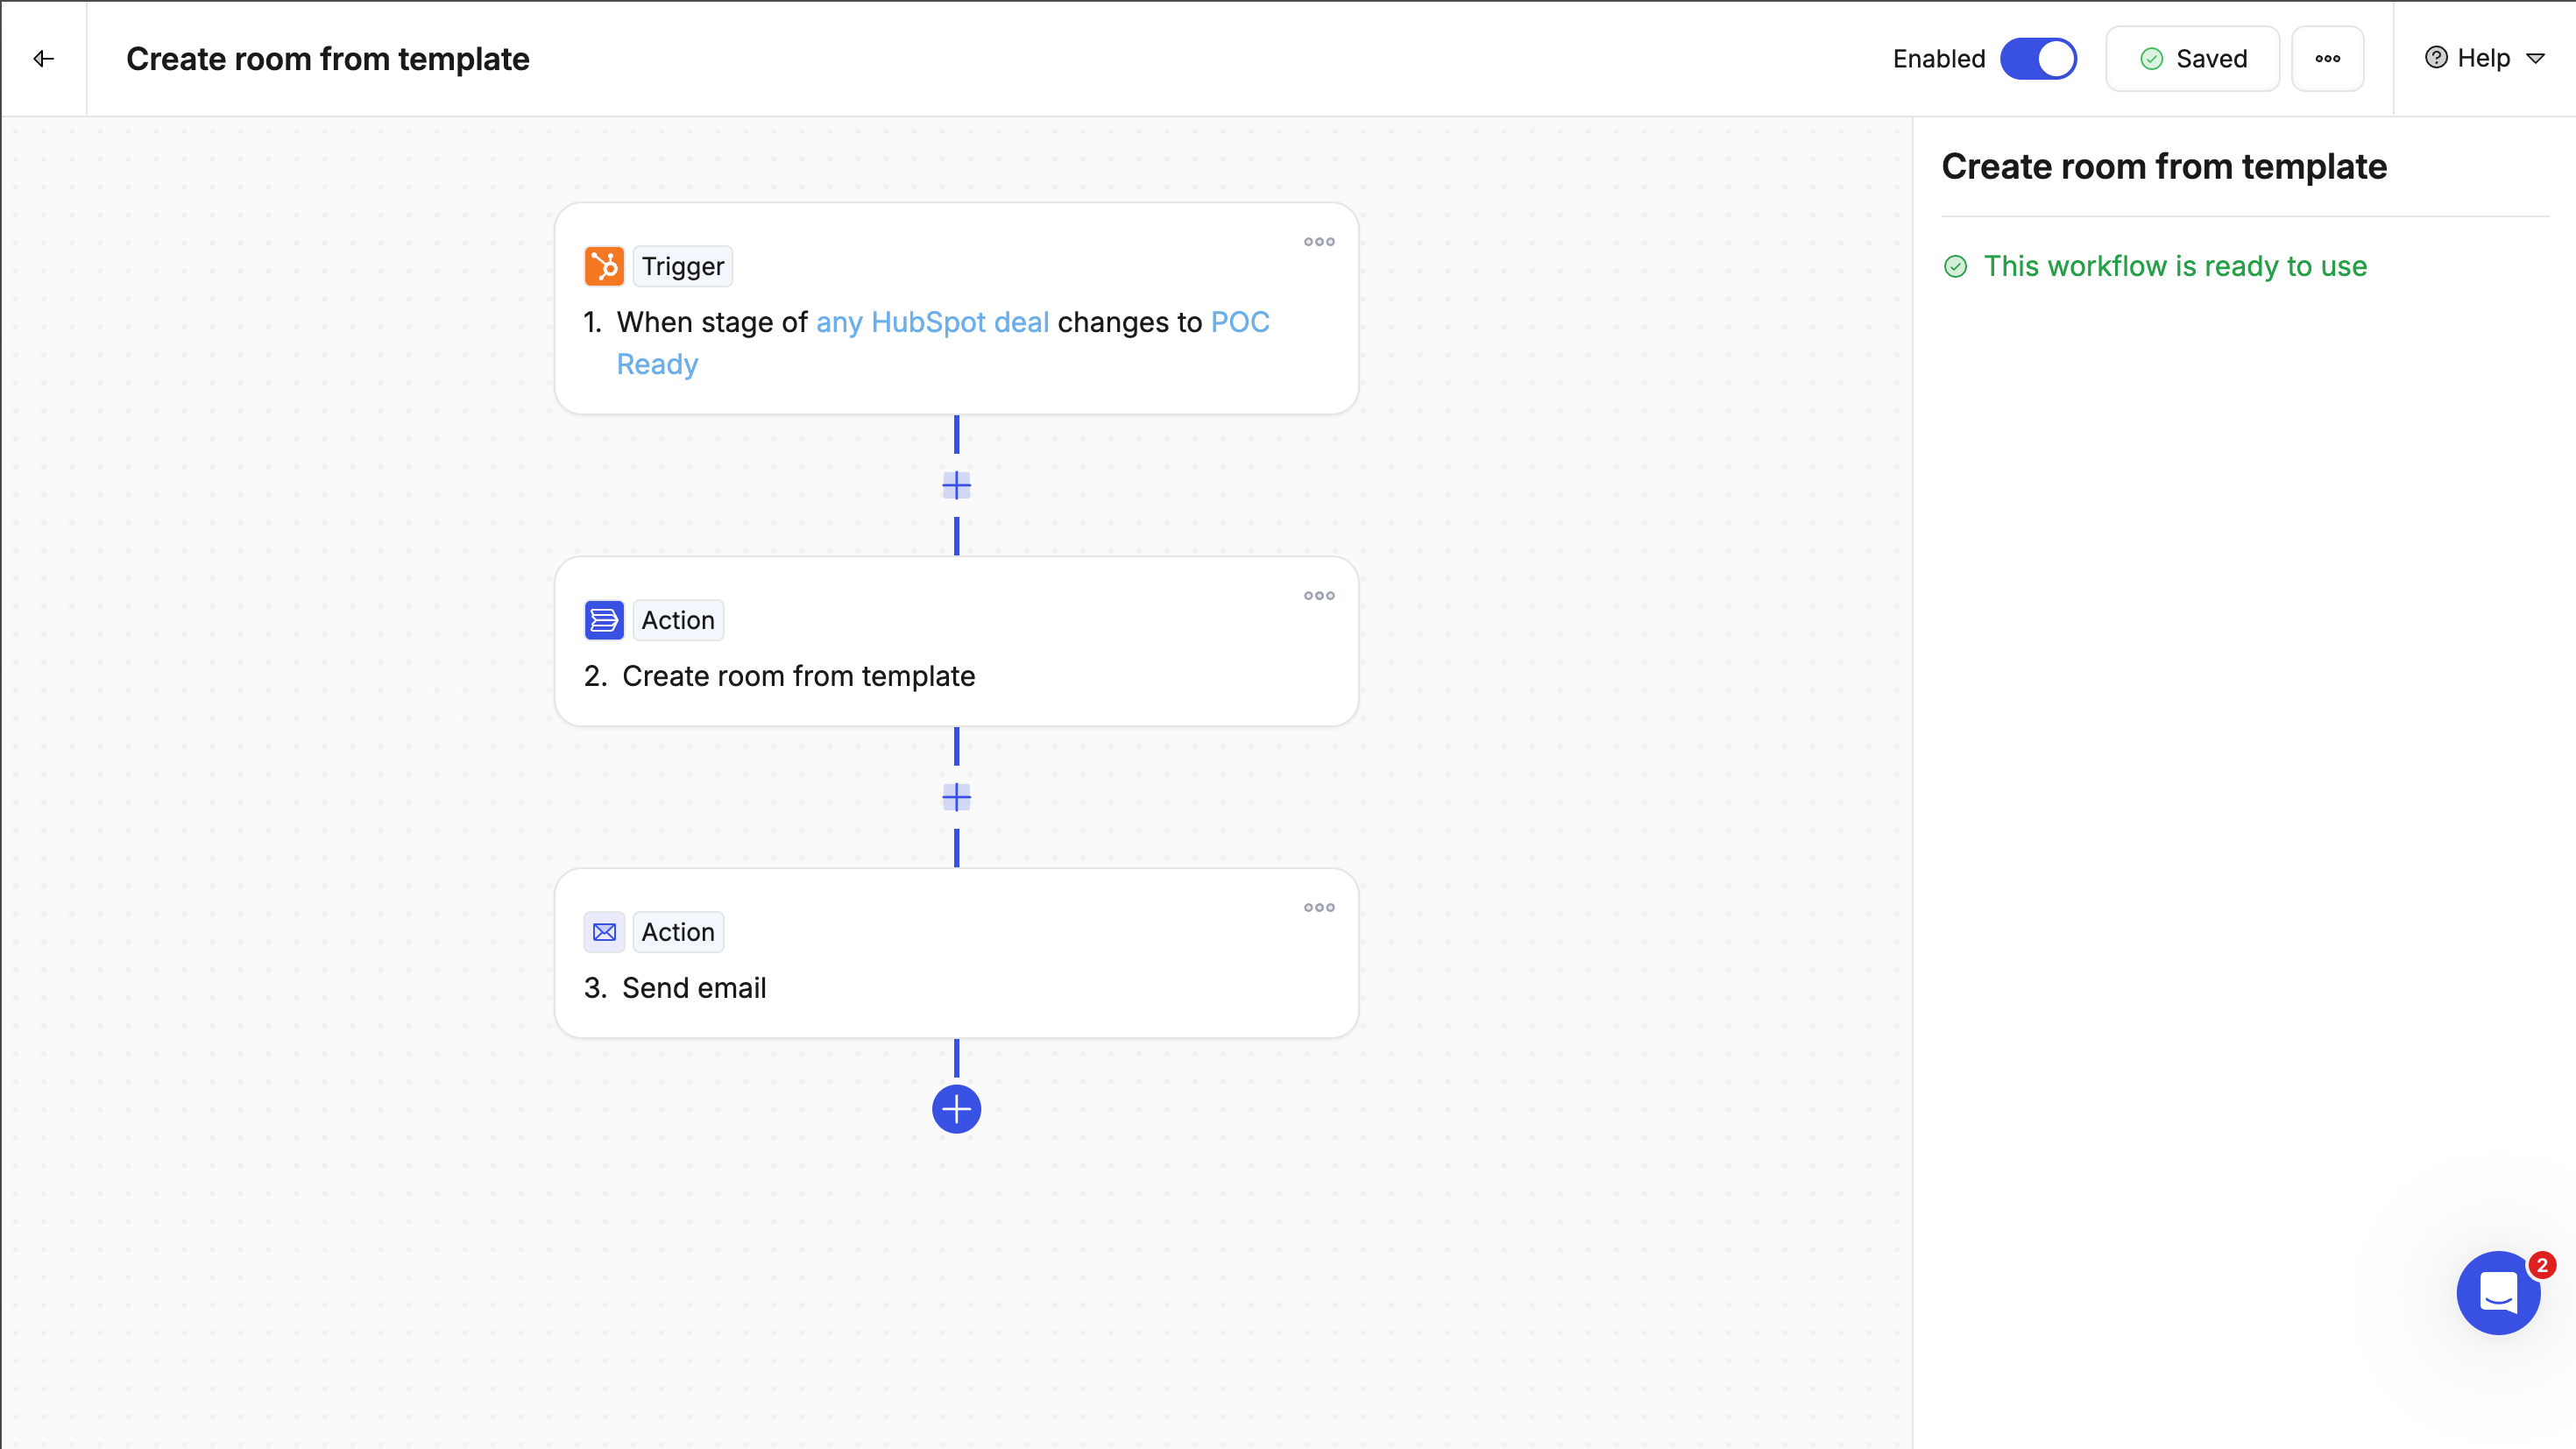
### Navigating the workflow builder
The workflow builder displays your automation as a visual sequence of steps.
Click any card in the workflow to view and configure its details.
The setup fields will appear in the right panel, use it to adjust settings, map data, and set conditions for each step in your workflow.
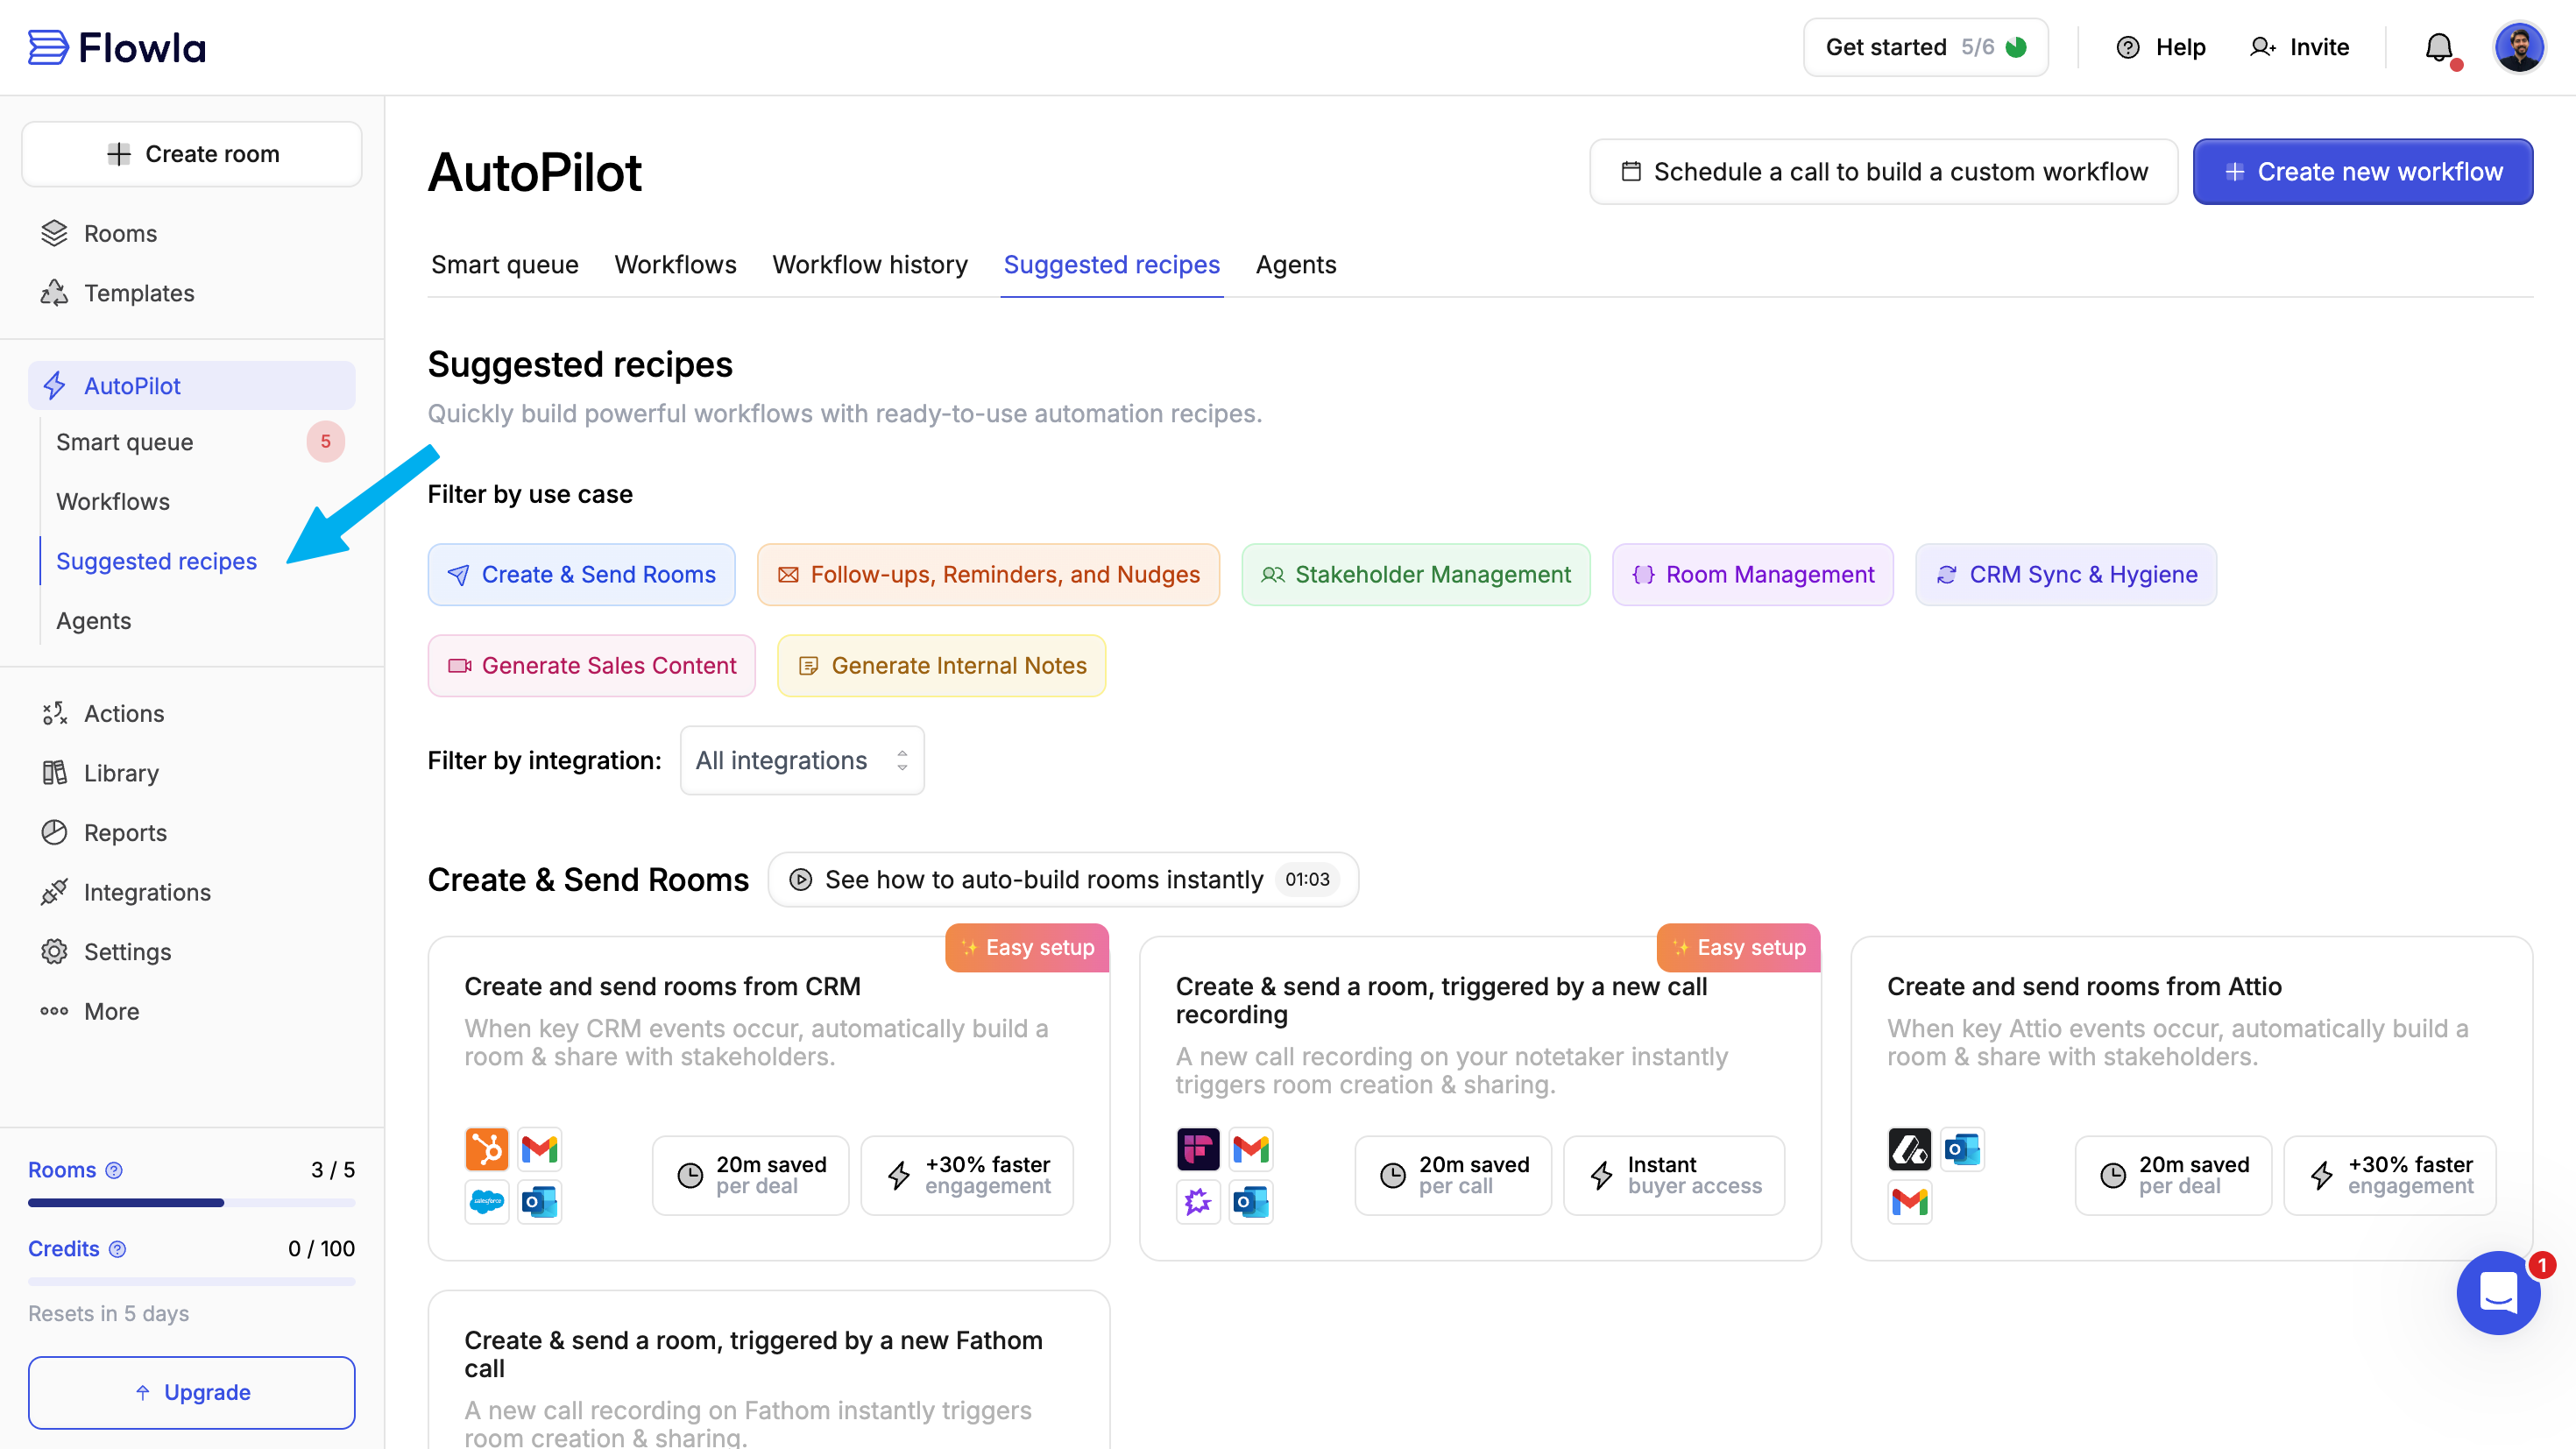
 ### Step 1: Start with a recipe
Recipes are pre-built workflow templates designed to get you started quickly. Instead of building from scratch, select a recipe that matches your use case and customize it.
From your Flowla dashboard, go to **AutoPilot → Suggested recipes**.
### Step 1: Start with a recipe
Recipes are pre-built workflow templates designed to get you started quickly. Instead of building from scratch, select a recipe that matches your use case and customize it.
From your Flowla dashboard, go to **AutoPilot → Suggested recipes**.
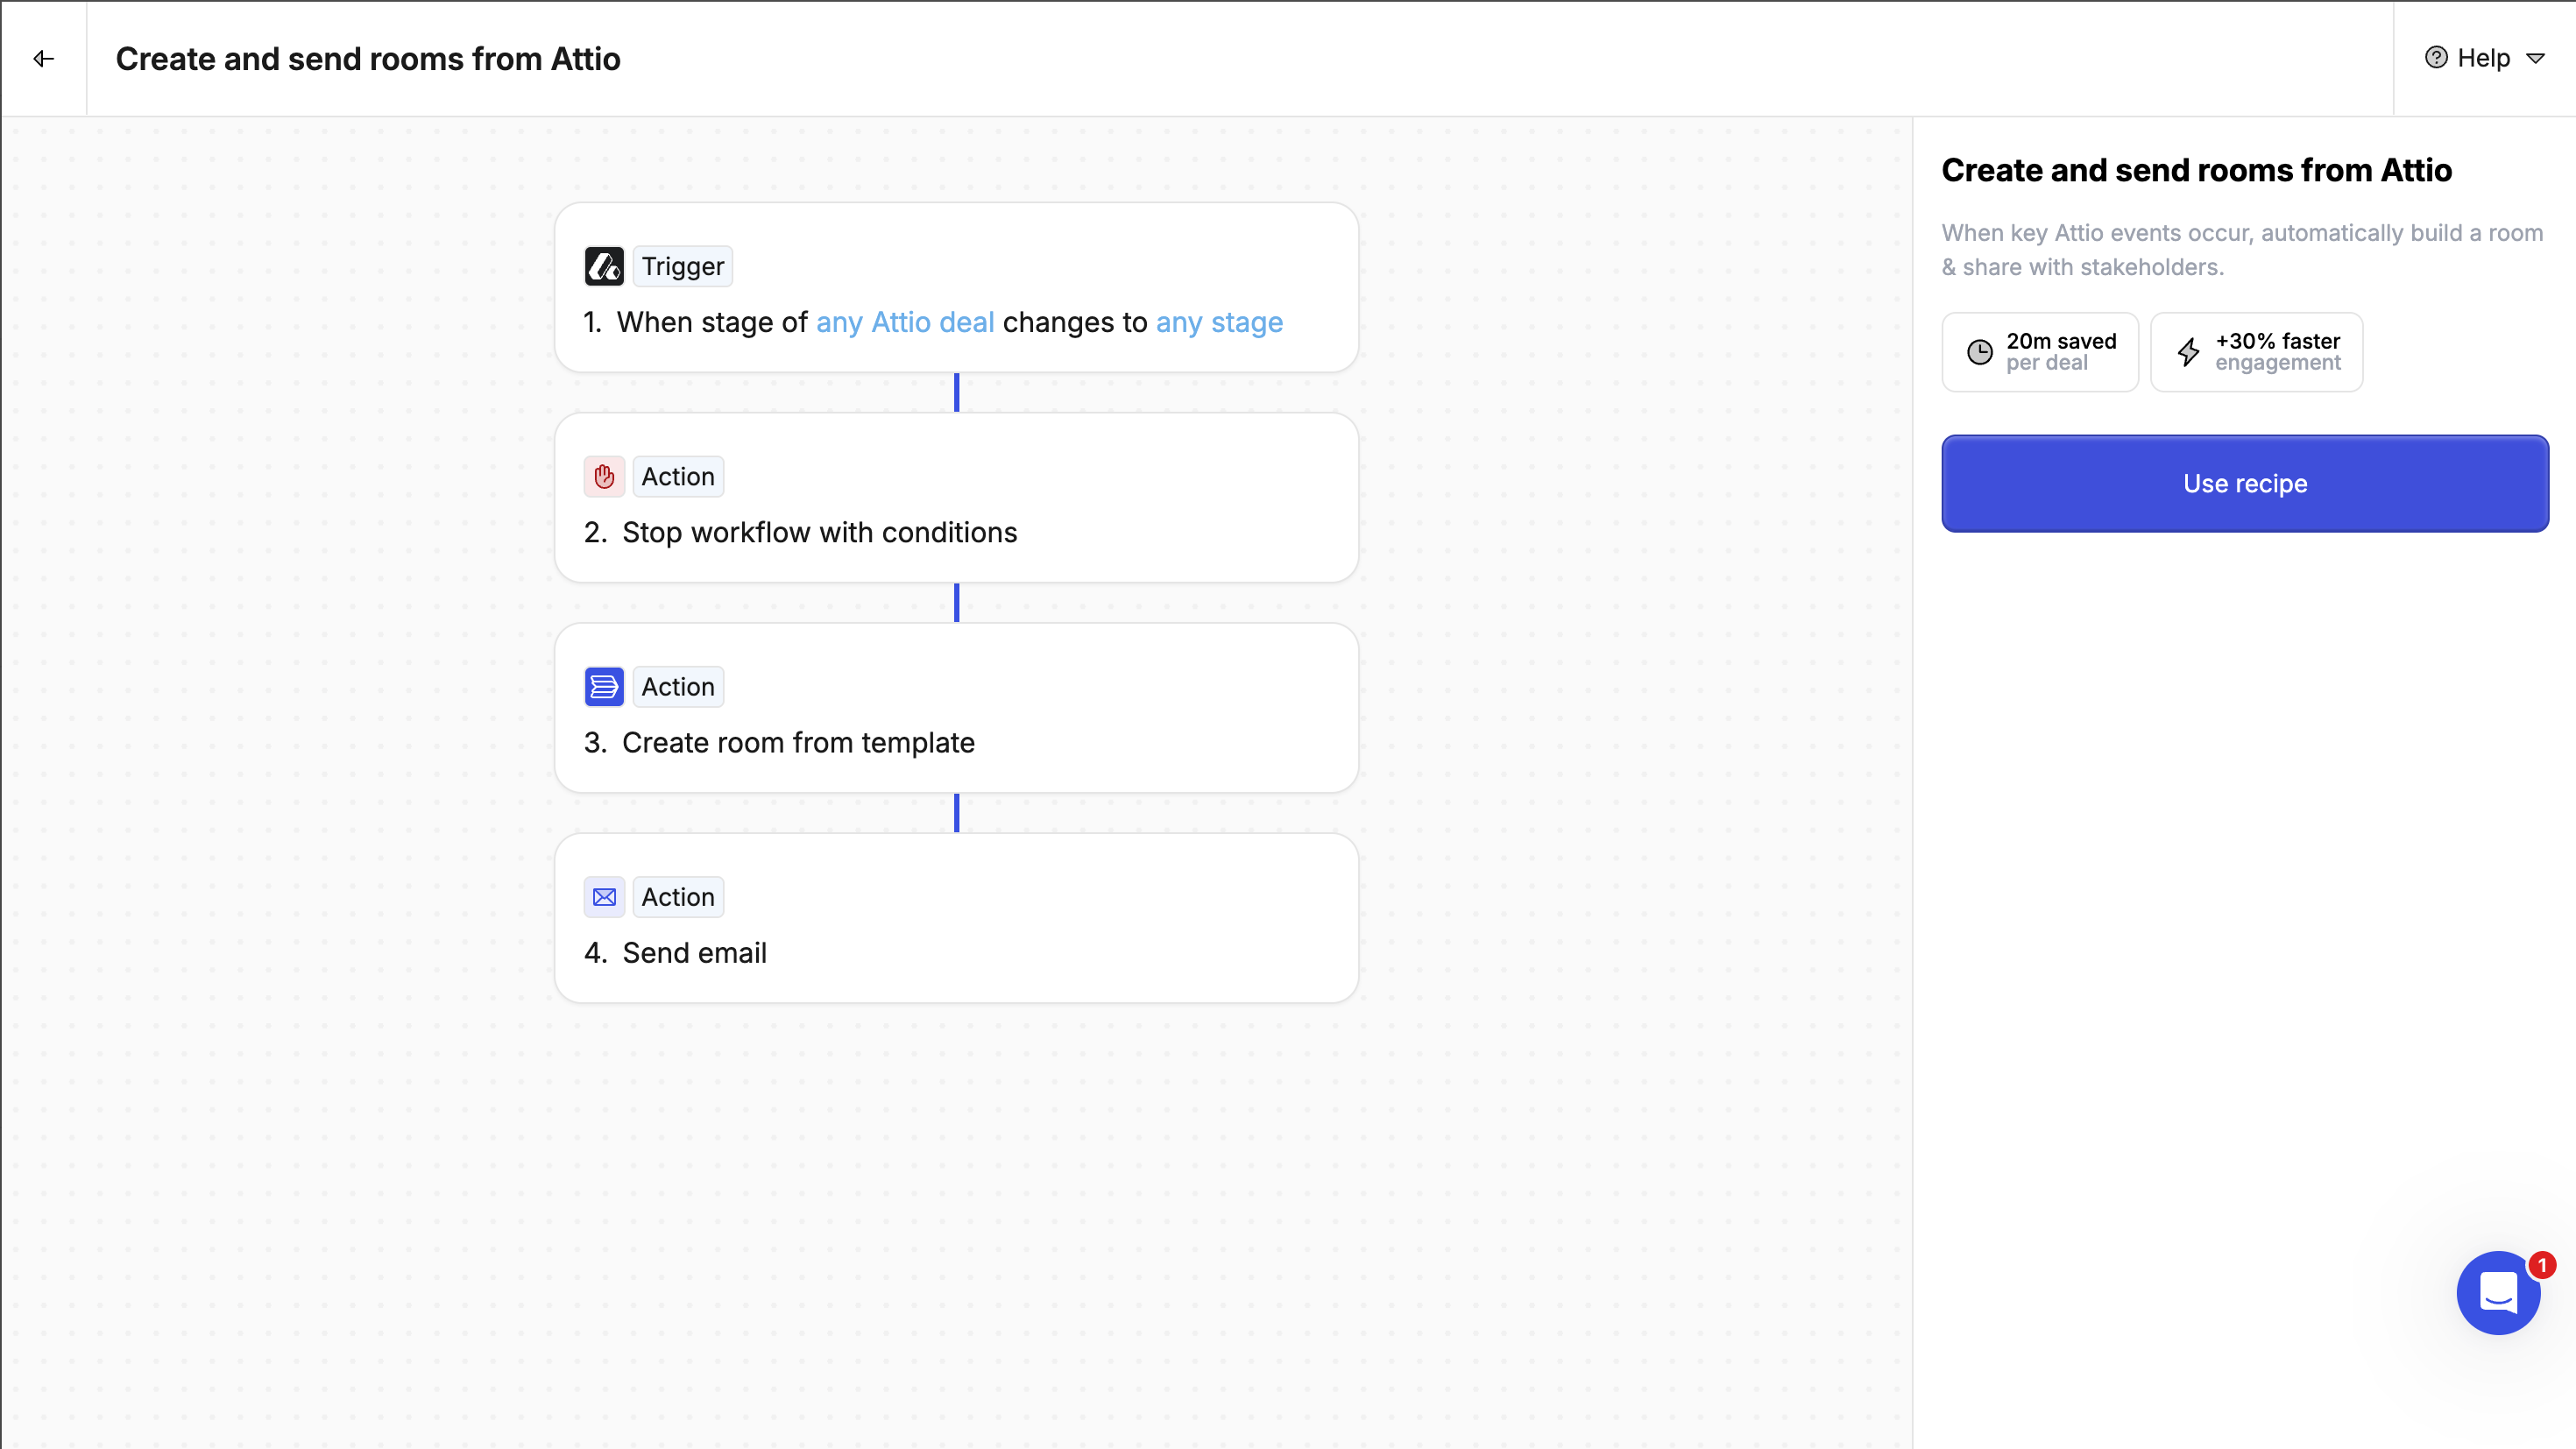
 Choose the recipe that best fits your needs. You can customize it after selection.
Click the **Use recipe** button to make workflow yours.
Choose the recipe that best fits your needs. You can customize it after selection.
Click the **Use recipe** button to make workflow yours.
 ### Step 2: Configure fields
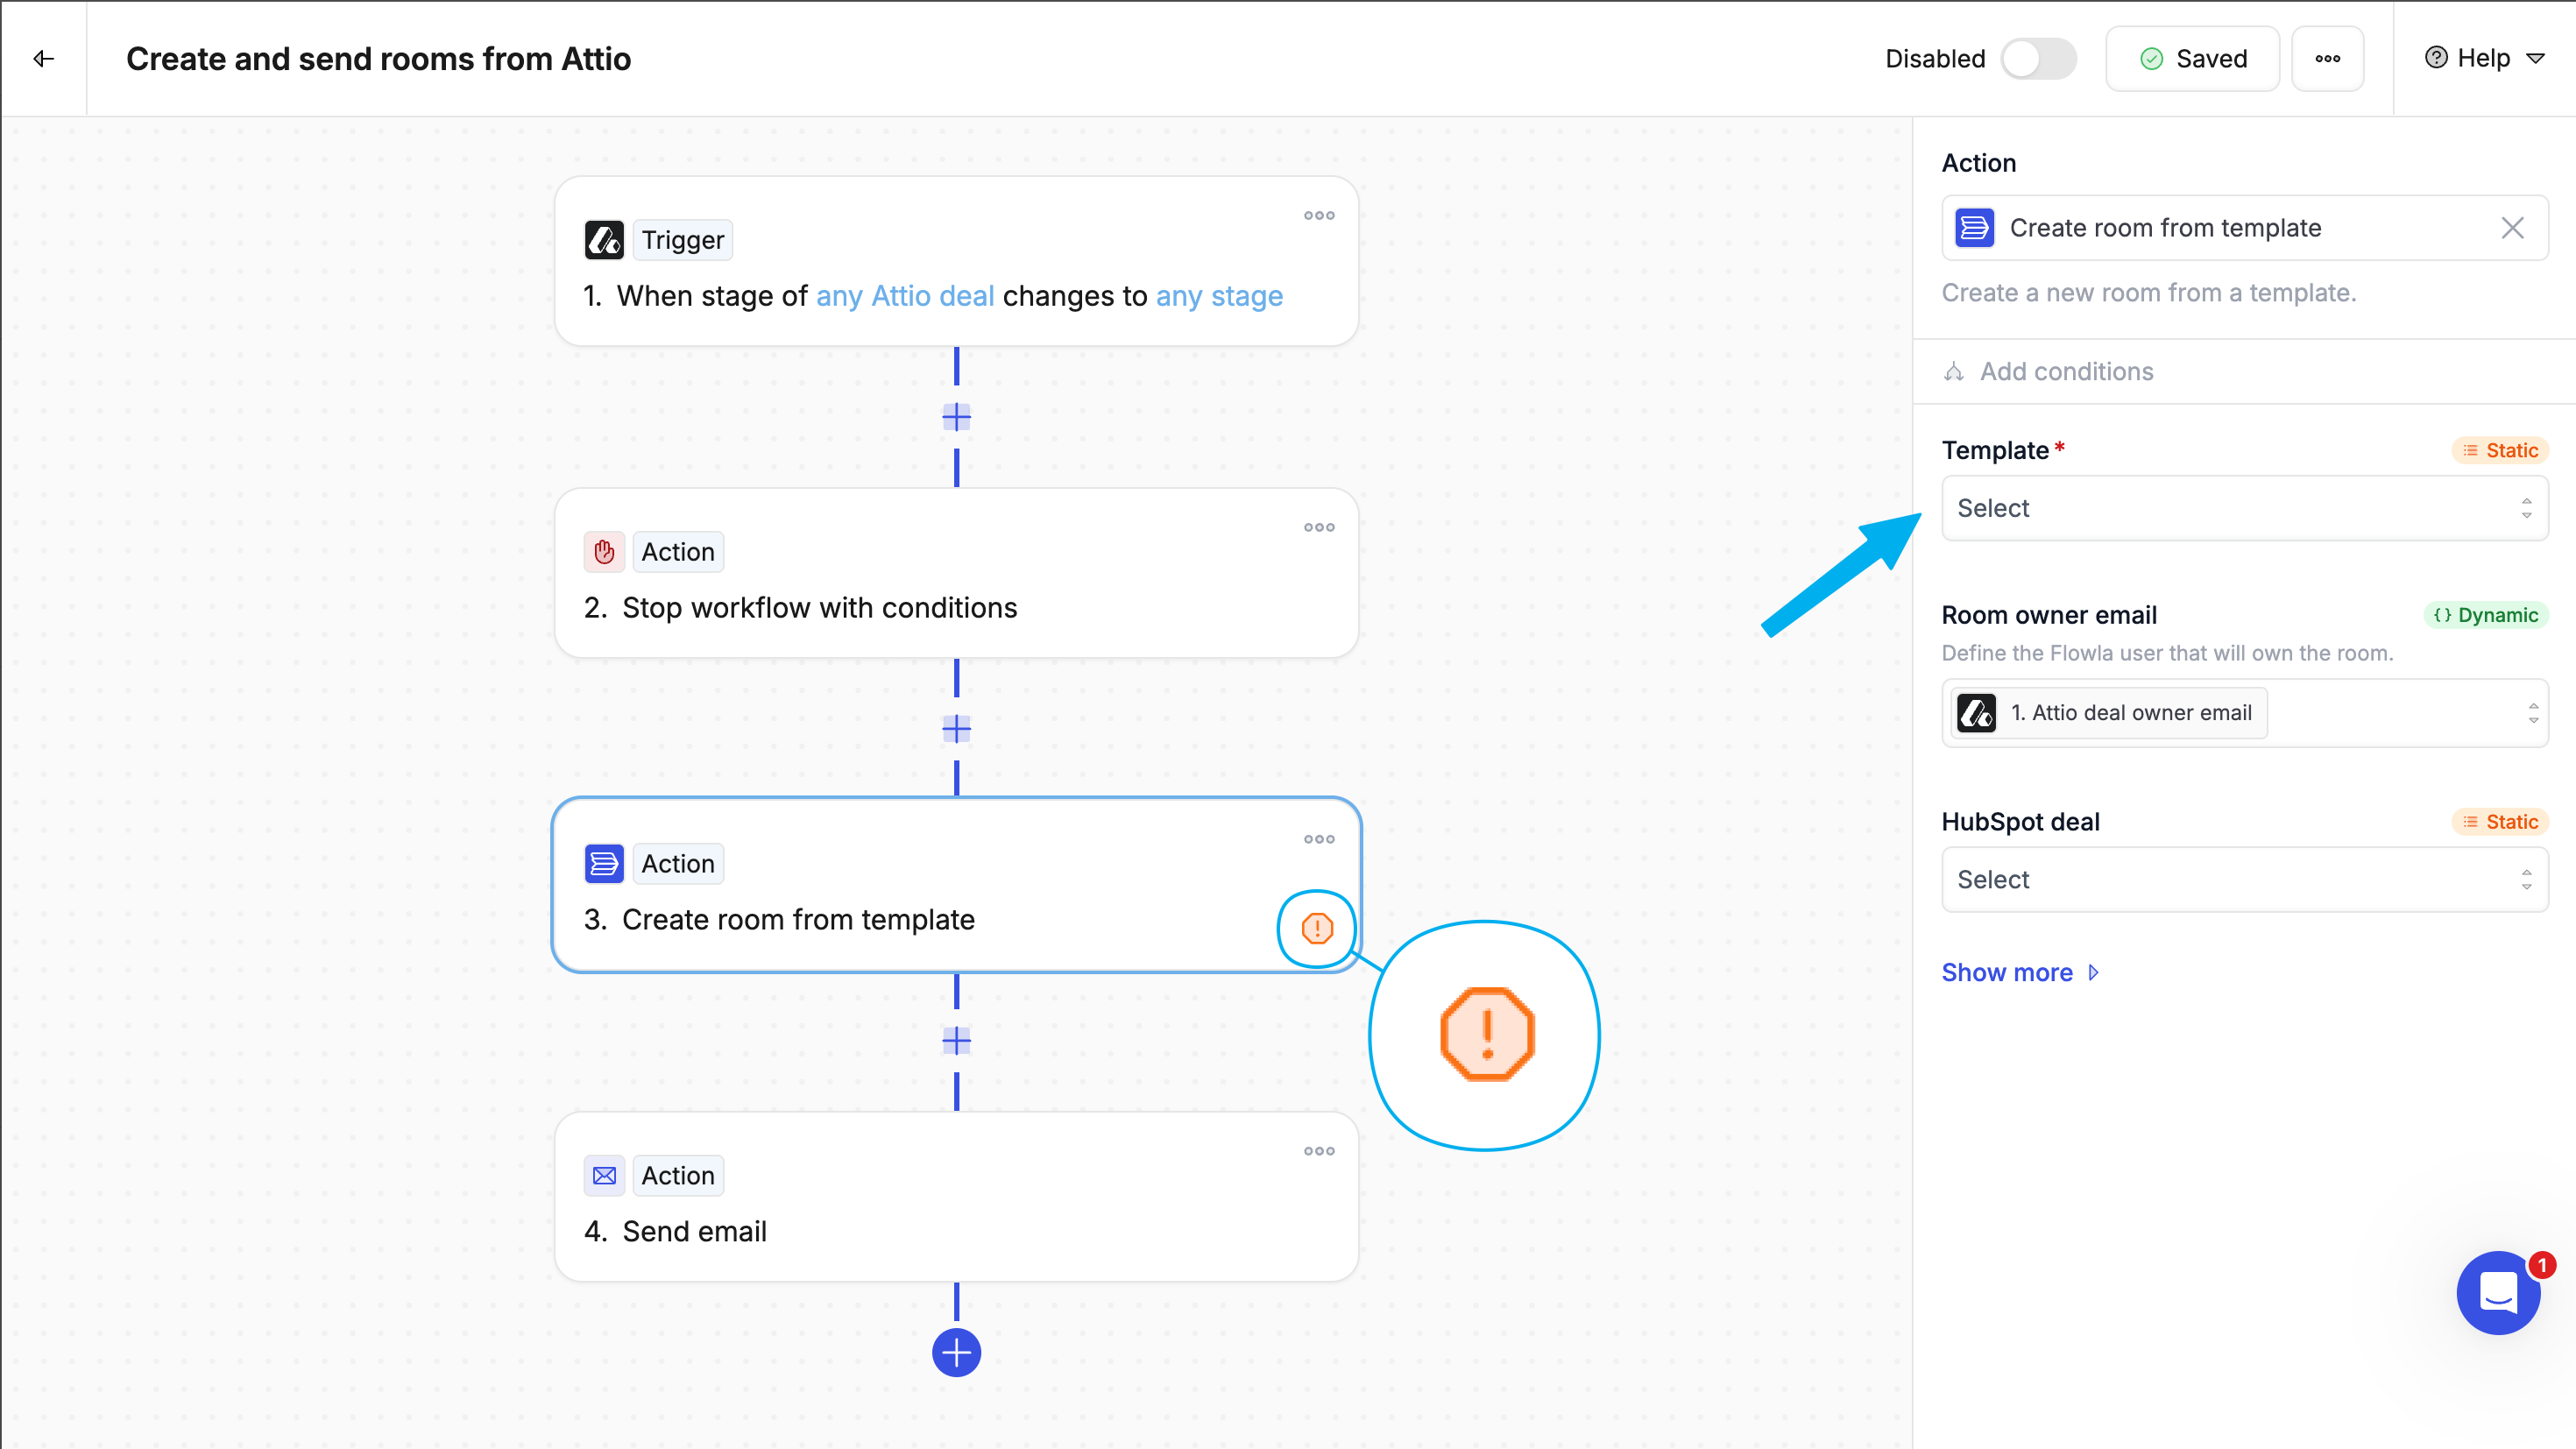 Recipes are mostly configured, however there are some fields which require configuration.
On the cards, you'll see a warning if there are fields requiring configuration. Click on the cards to configure.
**Input types**
Dynamic inputs pull data from previous steps in your workflow, allowing values to change based on the actual data flowing through the automation. These inputs adapt to each unique execution.
Reference data from trigger events or previous actions, changes with each workflow execution.
Static inputs are fixed values that you define when setting up your workflow. These values remain constant across all executions of the workflow, regardless of the data that triggers it.
Set once during workflow configuration, same value used every time the workflow runs.
### Step 3: Test, and enable
Once your workflow is ready:
1. Give it a clear name
2. Run a test inside a room or connected CRM deal
3. Once you're confident, click **Enable**
💡 *You can always come back and edit it later.*
### Step 4: Review the output before it goes live
Recipes are mostly configured, however there are some fields which require configuration.
On the cards, you'll see a warning if there are fields requiring configuration. Click on the cards to configure.
**Input types**
Dynamic inputs pull data from previous steps in your workflow, allowing values to change based on the actual data flowing through the automation. These inputs adapt to each unique execution.
Reference data from trigger events or previous actions, changes with each workflow execution.
Static inputs are fixed values that you define when setting up your workflow. These values remain constant across all executions of the workflow, regardless of the data that triggers it.
Set once during workflow configuration, same value used every time the workflow runs.
### Step 3: Test, and enable
Once your workflow is ready:
1. Give it a clear name
2. Run a test inside a room or connected CRM deal
3. Once you're confident, click **Enable**
💡 *You can always come back and edit it later.*
### Step 4: Review the output before it goes live
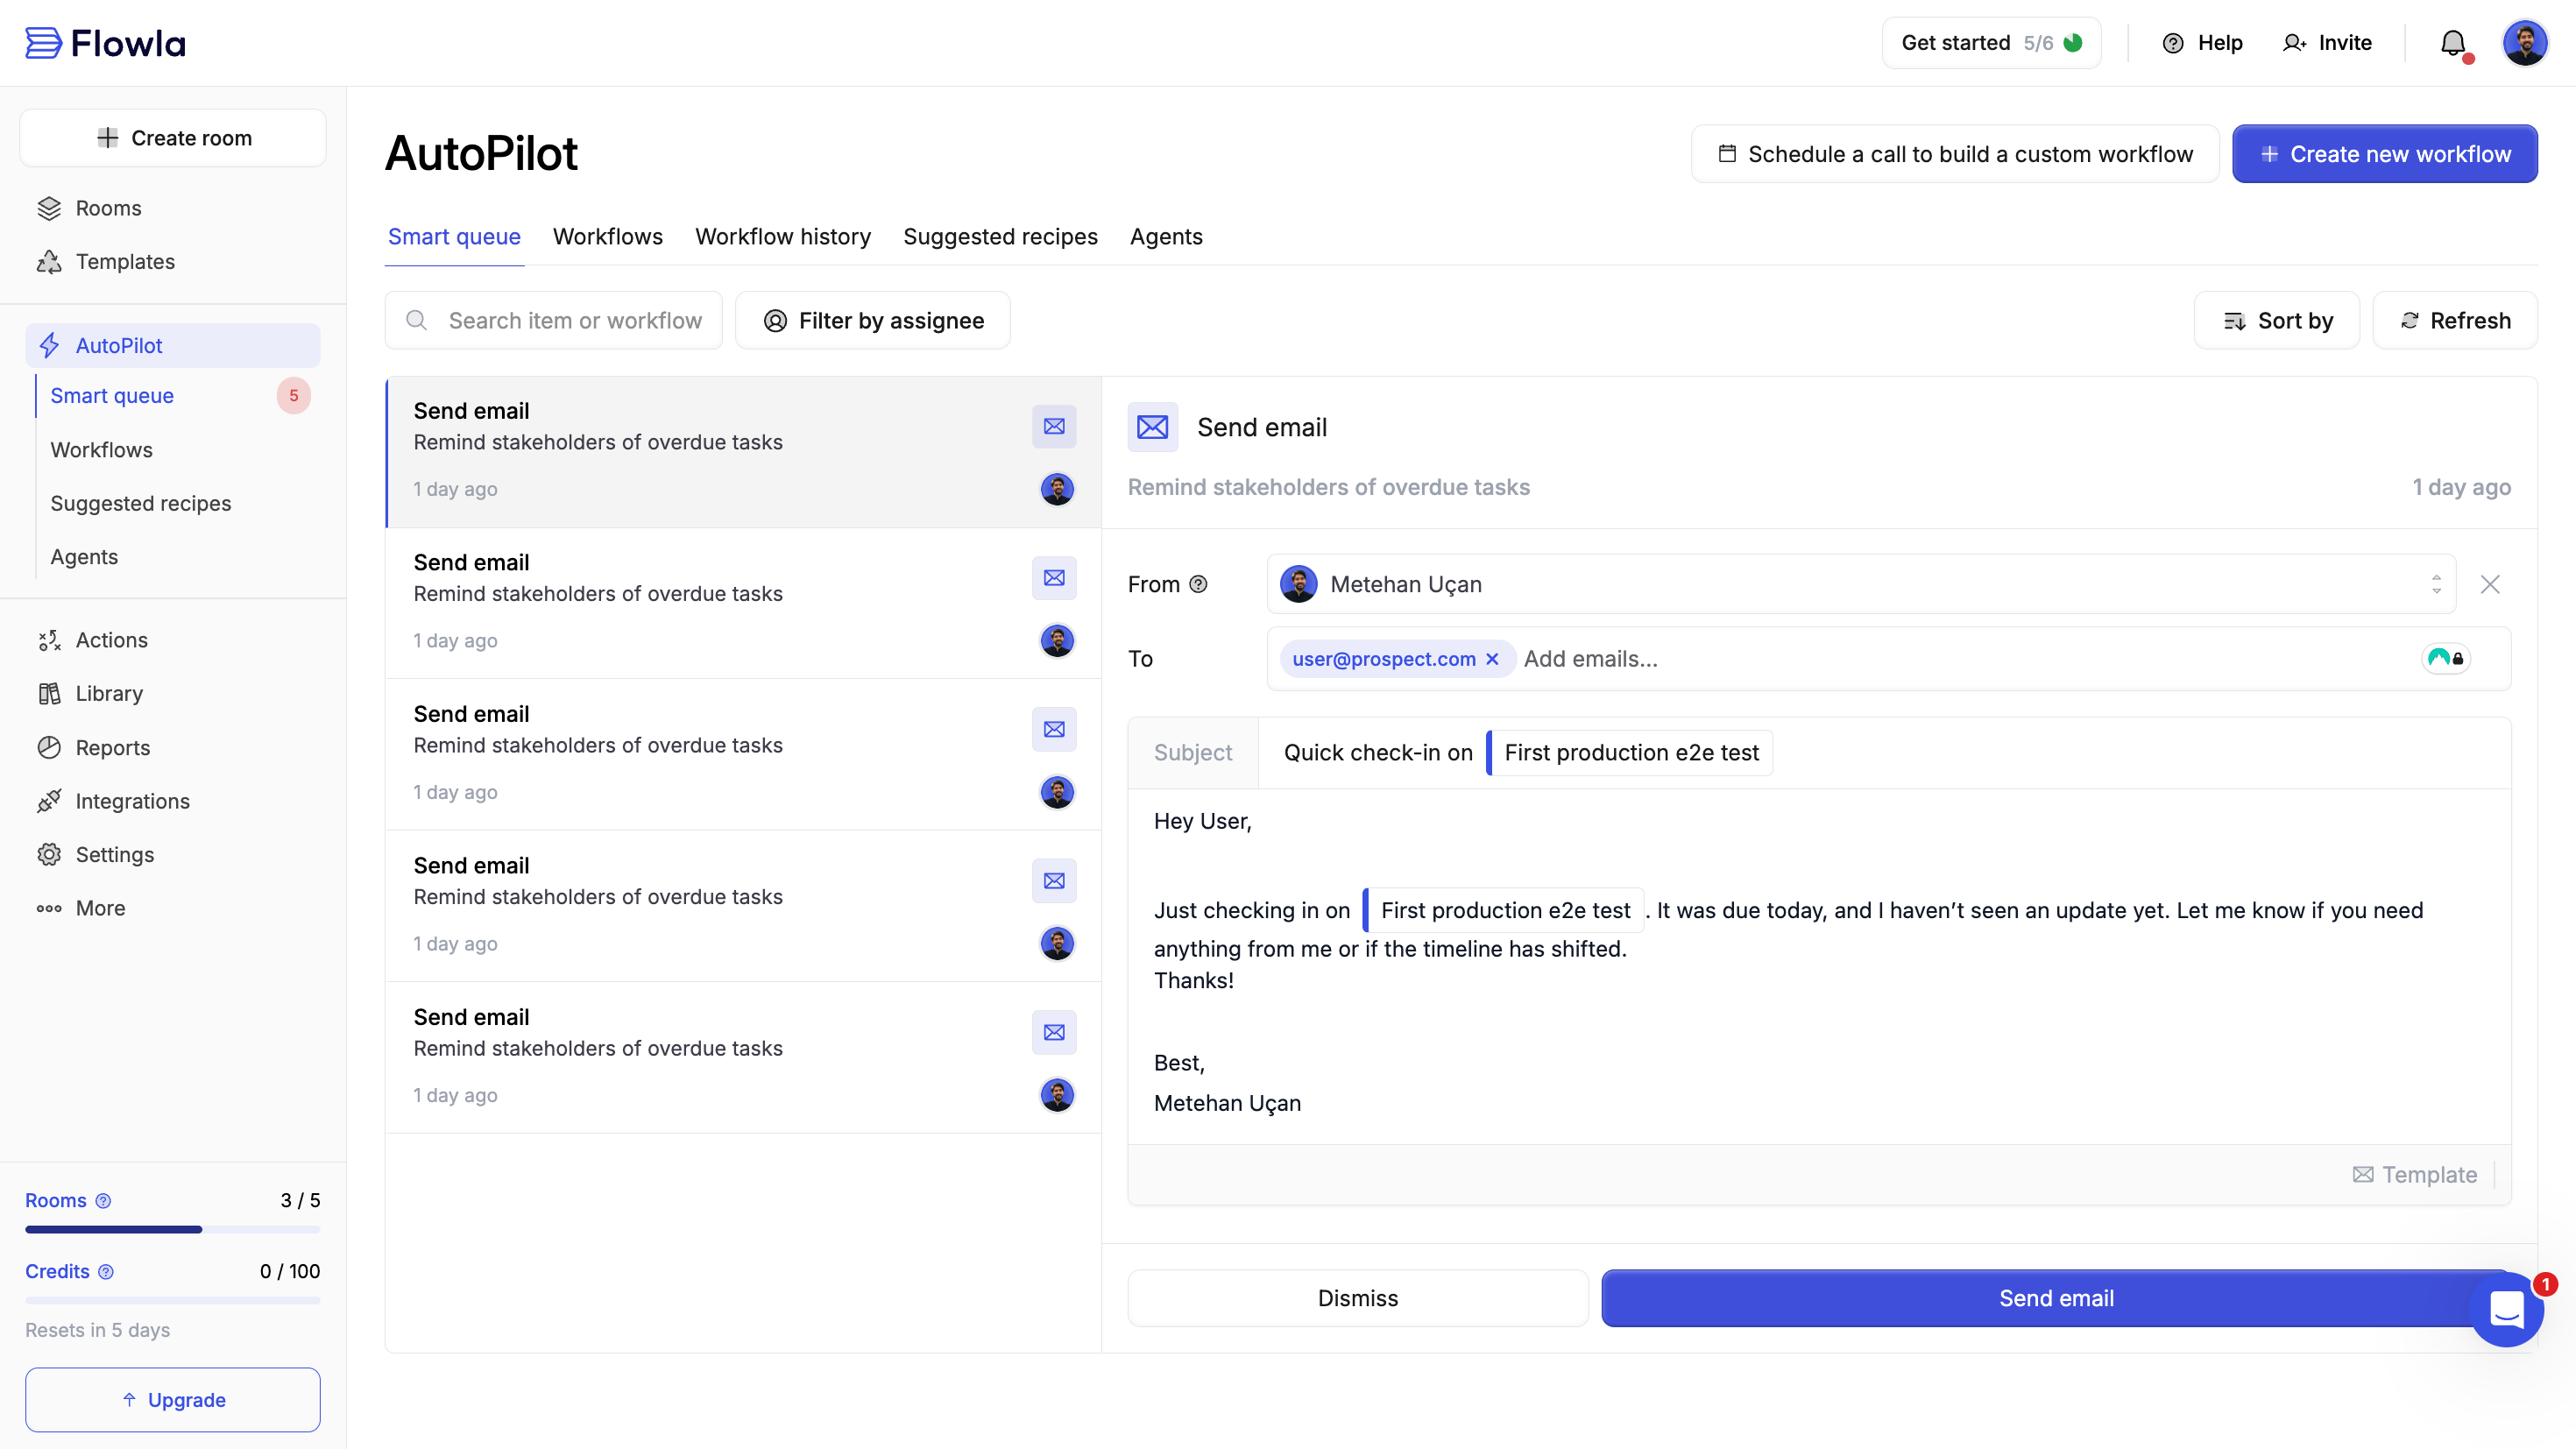 If your action involves AI-generated content (like an email), you can enable the **“Add to queue for review”** toggle.That way, the content will be added to your **Smart Queue** for final approval before anything gets sent or published.
**Smart Queue is where you'll see all your pending workflow drafts**: follow-ups, summaries, business cases, and more. Spend just a few minutes each morning reviewing and sending what matters, all without writing from scratch.
### Step 1: Choose a Trigger
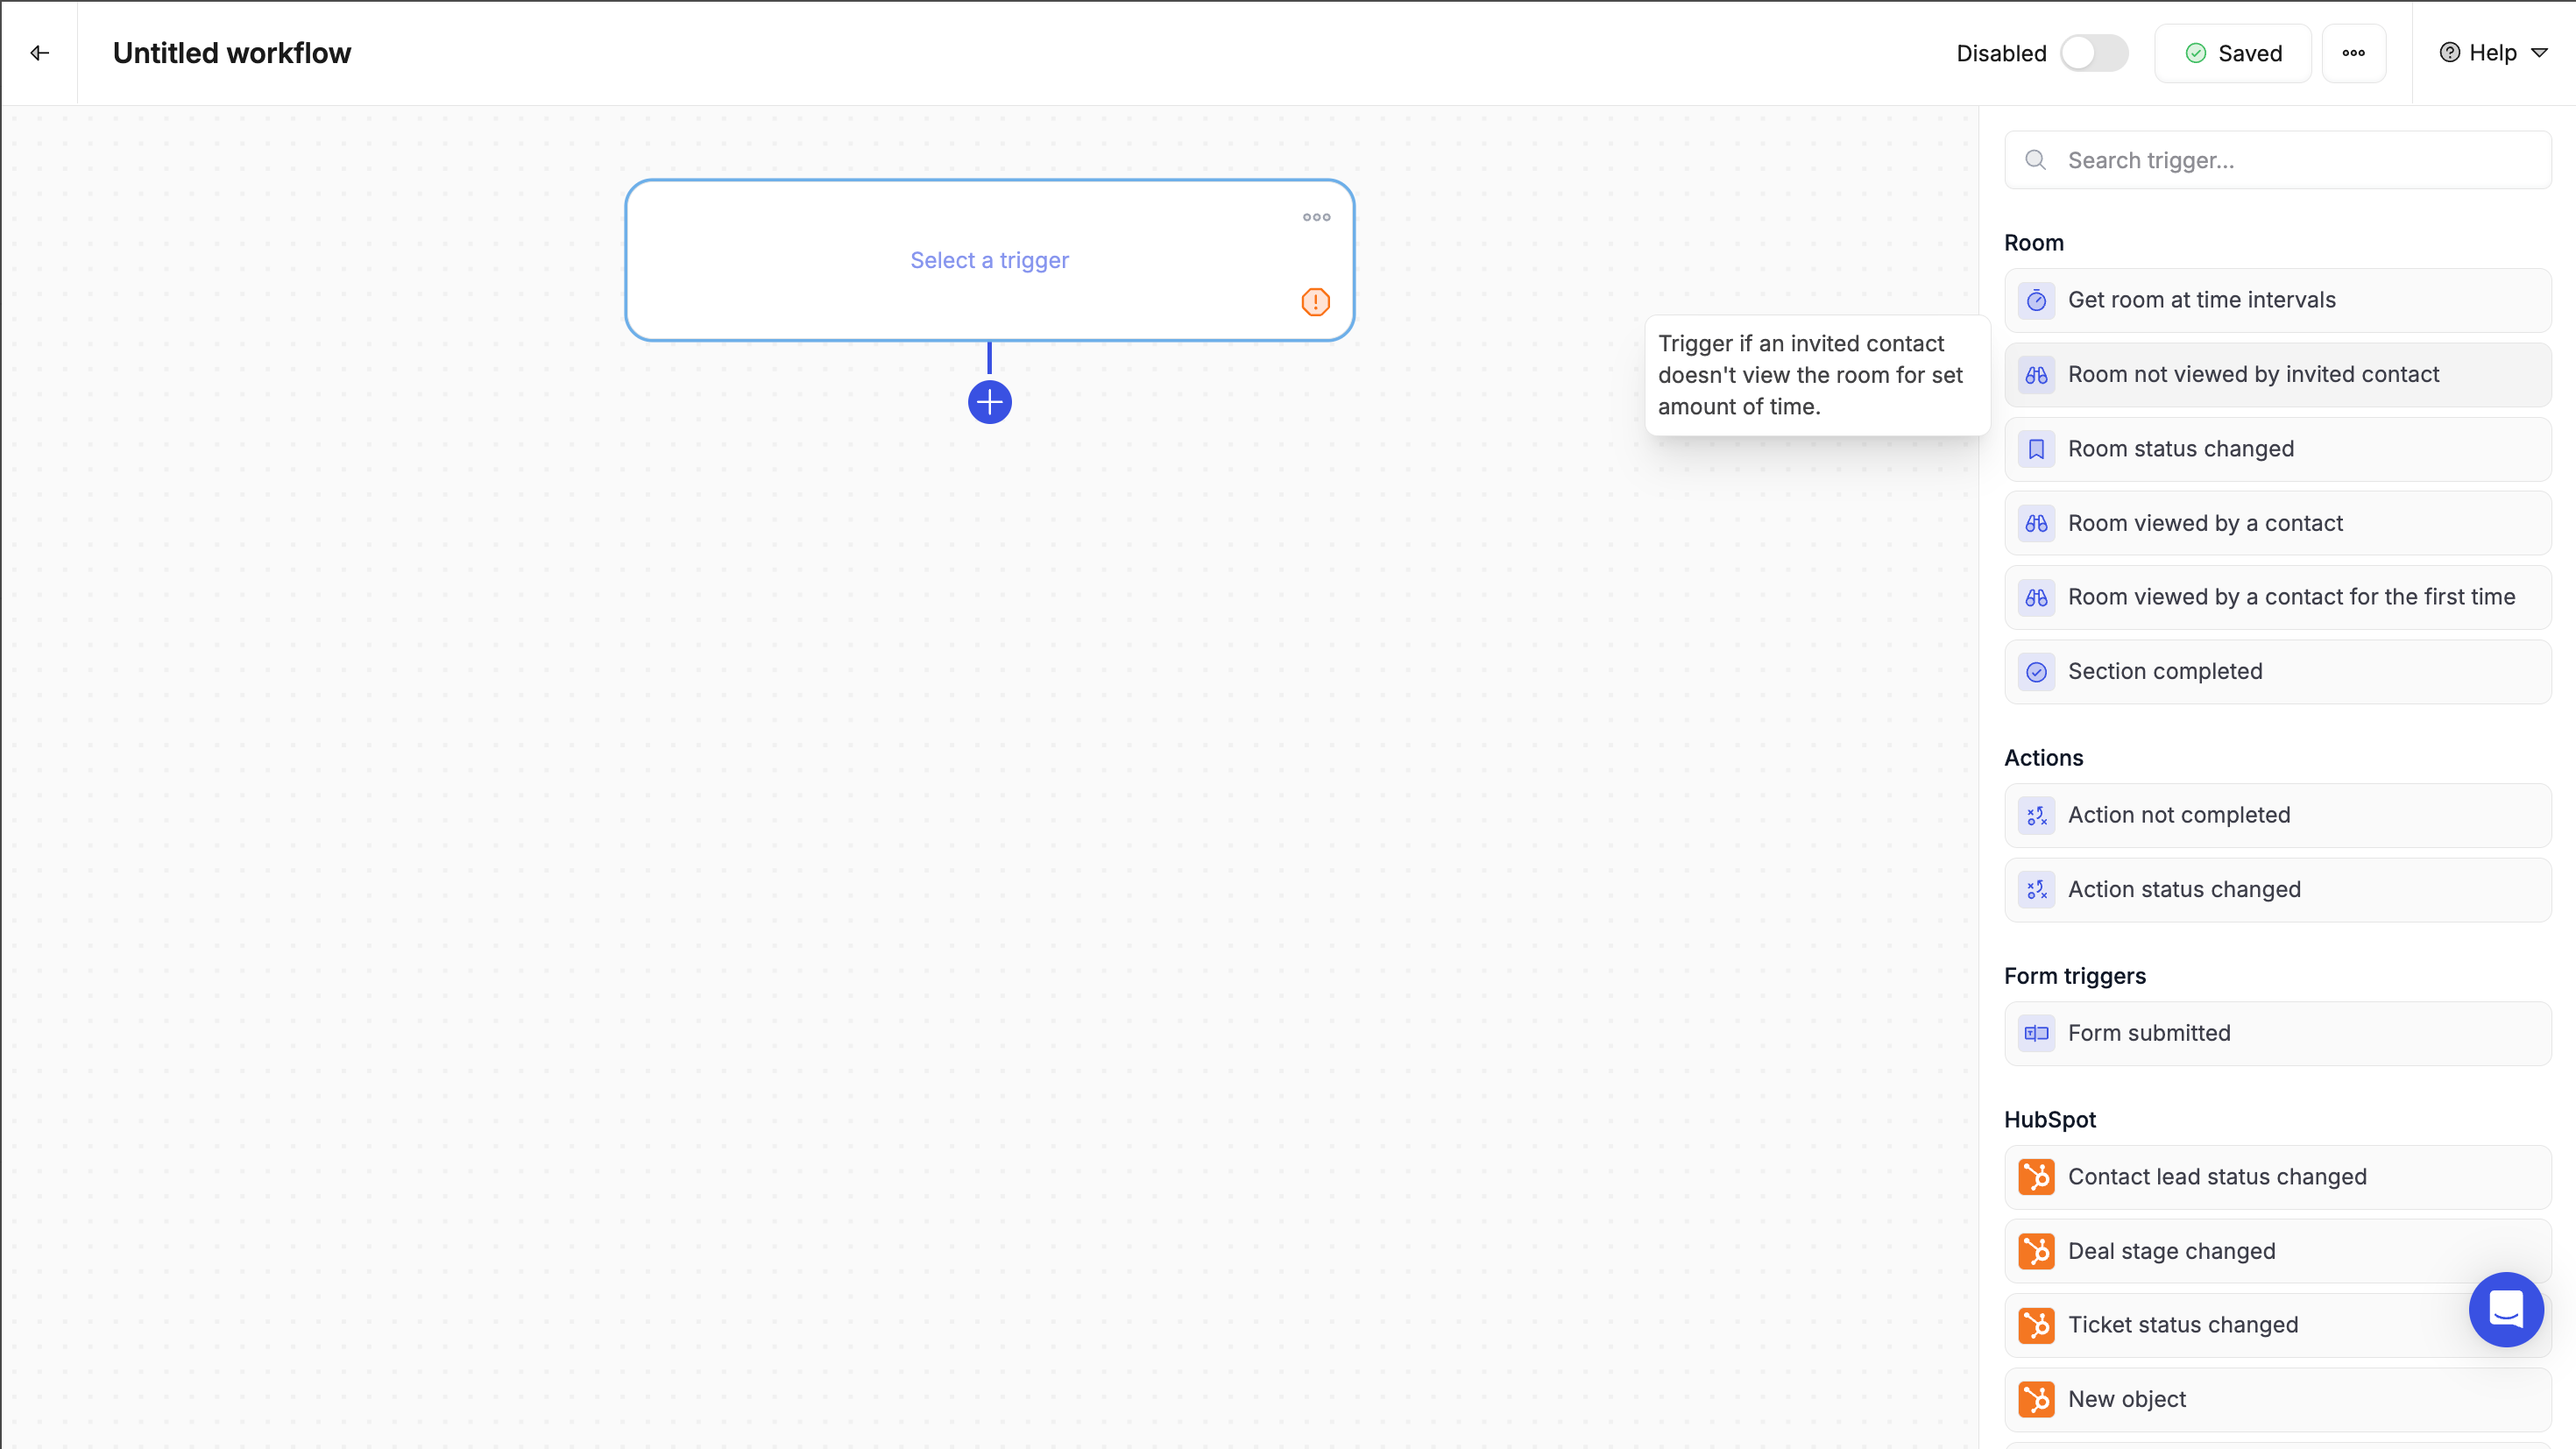
Start in the **Workflow Builder** and click **“Select a Trigger.”** This defines what event will activate your workflow.
Some trigger examples:
* A **room is viewed**
* A **form is submitted**
* A **deal changes stage** in CRM
* A **webhook fires** from another app
You can add a **scope** to narrow it down: e.g. “Only run this workflow when a deal moves to ‘Discovery held”
If your action involves AI-generated content (like an email), you can enable the **“Add to queue for review”** toggle.That way, the content will be added to your **Smart Queue** for final approval before anything gets sent or published.
**Smart Queue is where you'll see all your pending workflow drafts**: follow-ups, summaries, business cases, and more. Spend just a few minutes each morning reviewing and sending what matters, all without writing from scratch.
### Step 1: Choose a Trigger
Start in the **Workflow Builder** and click **“Select a Trigger.”** This defines what event will activate your workflow.
Some trigger examples:
* A **room is viewed**
* A **form is submitted**
* A **deal changes stage** in CRM
* A **webhook fires** from another app
You can add a **scope** to narrow it down: e.g. “Only run this workflow when a deal moves to ‘Discovery held”
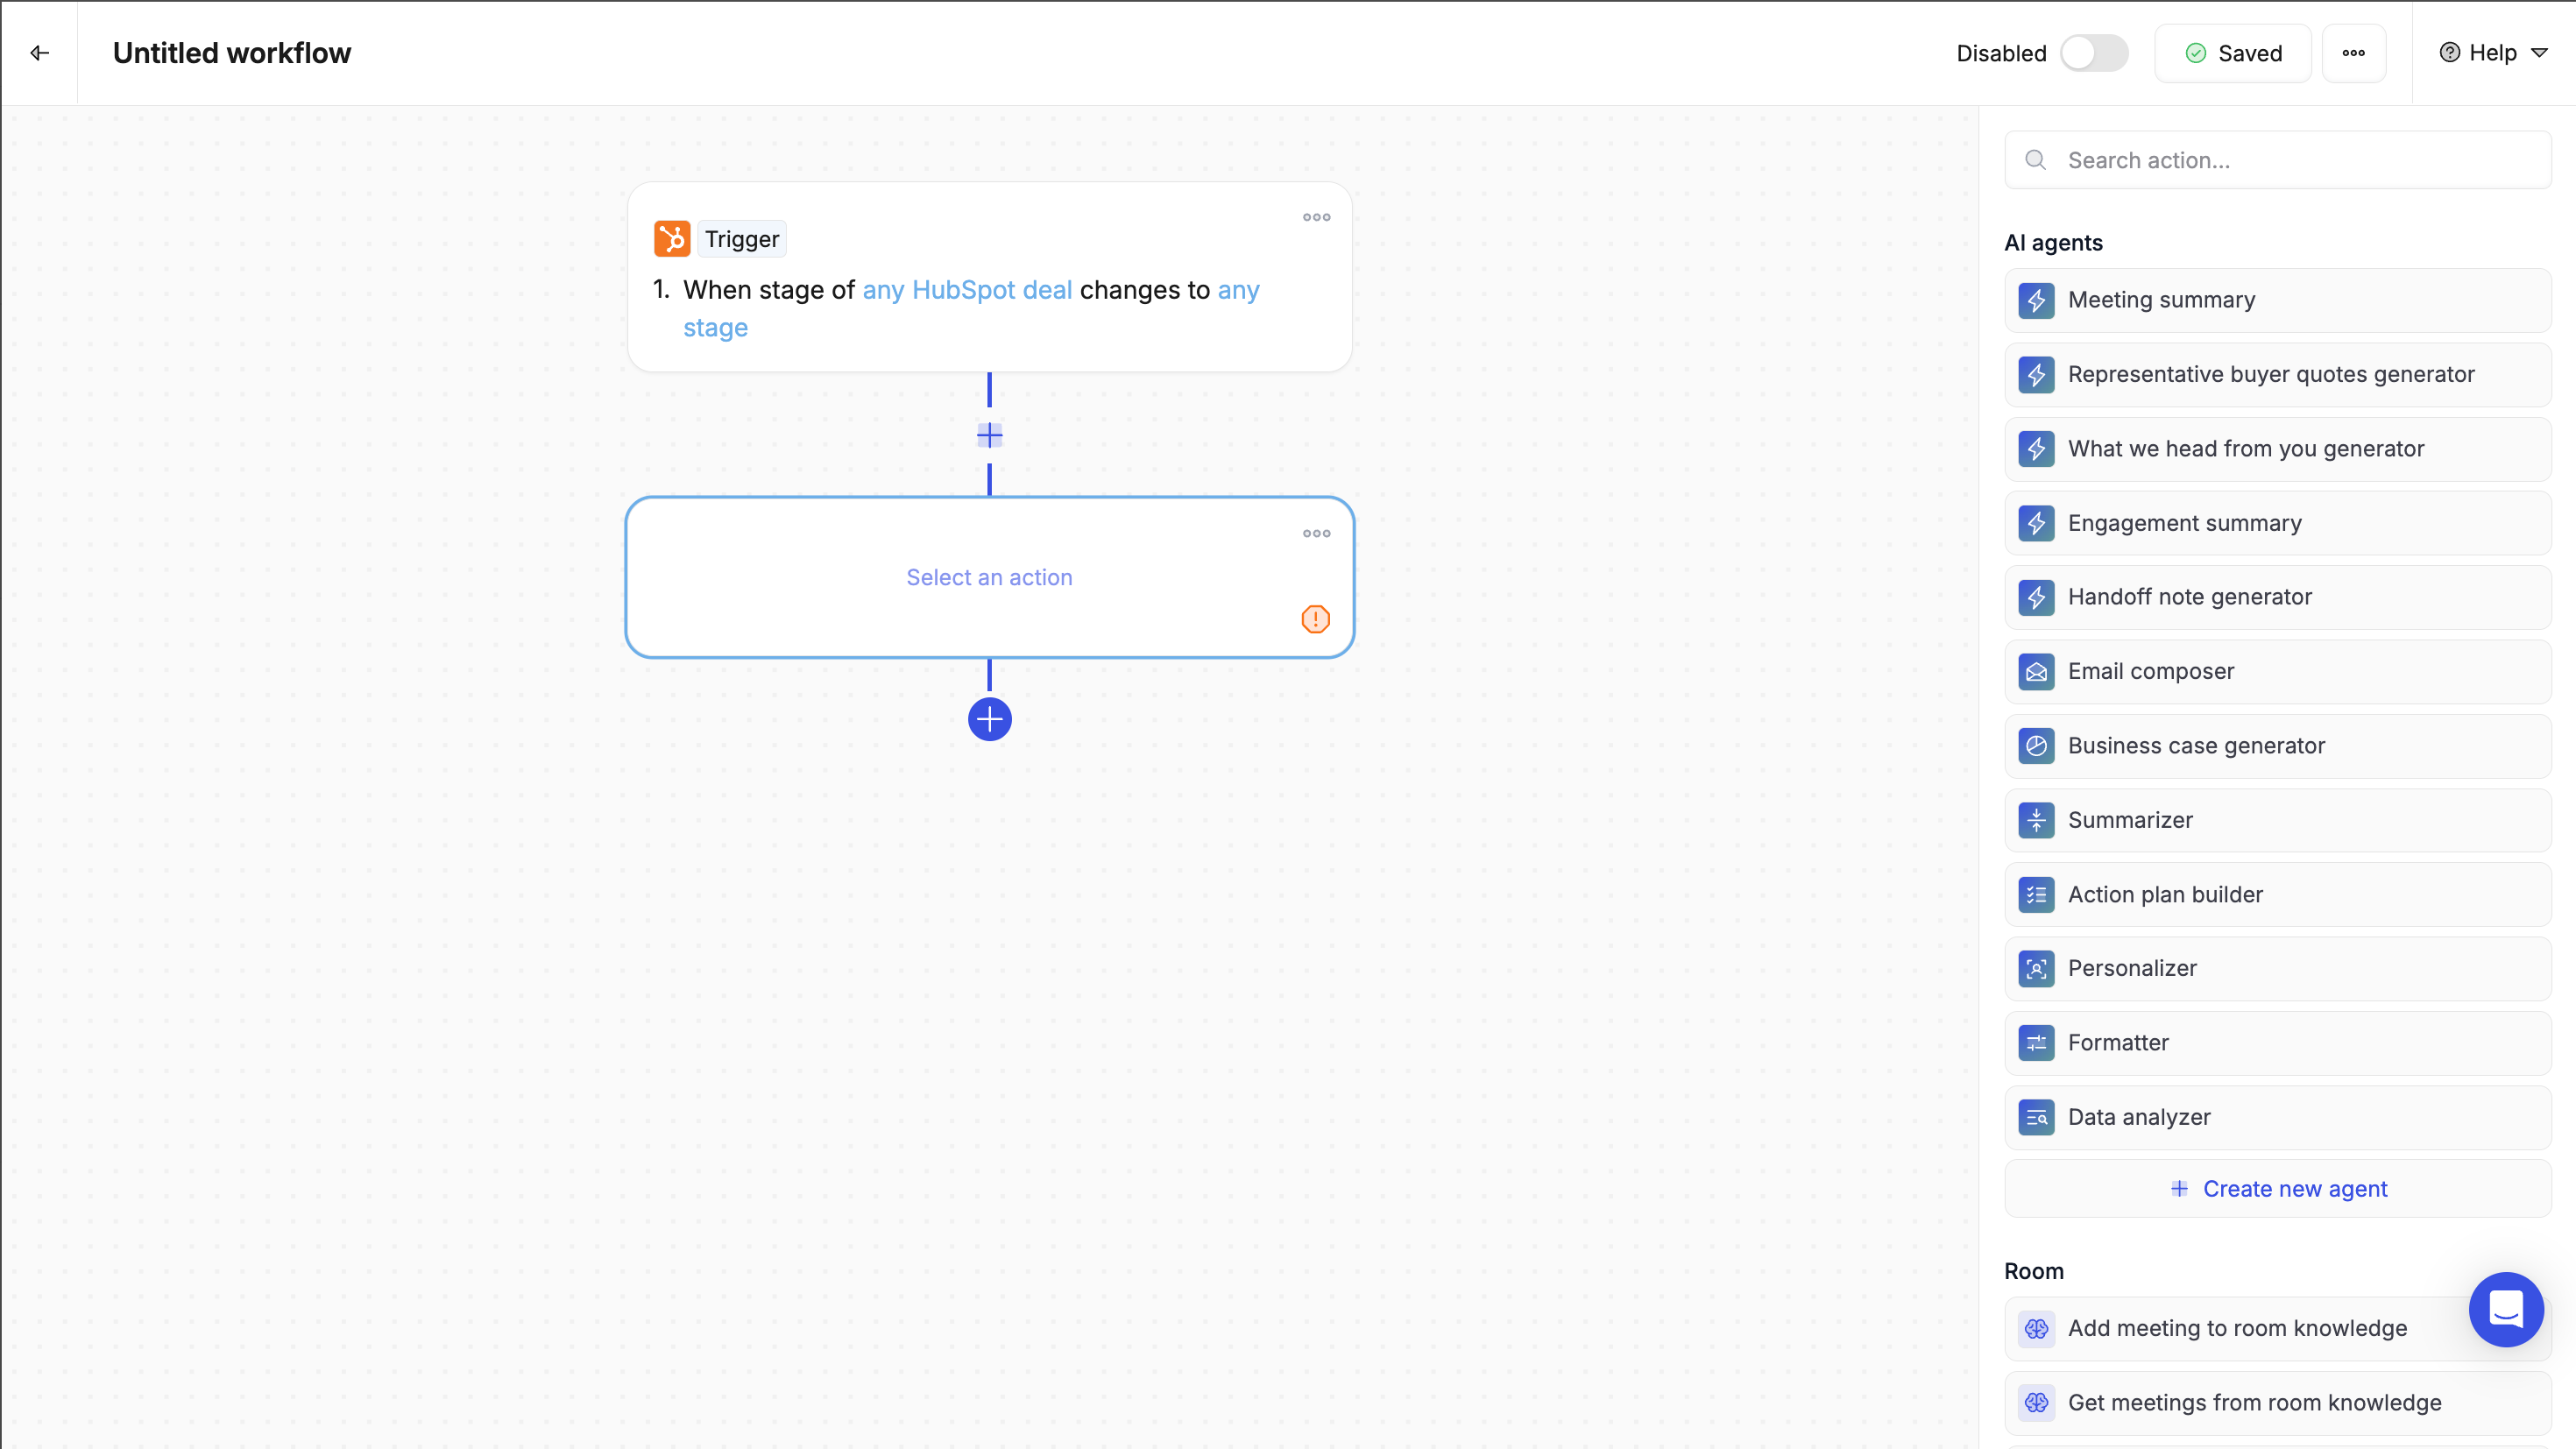
 ### Step 2: Add an Action
Click the **+** icon to add your first action. Actions define what happens once the workflow is triggered.
For example:
* Send an email
* Create a new room from a template
* Push or pull CRM data (HubSpot, Salesforce)
* Notify your team in Slack
Each action can also include **conditions** - rules for when it should run.
### Step 2: Add an Action
Click the **+** icon to add your first action. Actions define what happens once the workflow is triggered.
For example:
* Send an email
* Create a new room from a template
* Push or pull CRM data (HubSpot, Salesforce)
* Notify your team in Slack
Each action can also include **conditions** - rules for when it should run.
 ### Step 3: Add an AI-agent (Optional)
If you want Flowla to generate personalized content for you, drop in an **AI Agent** before your action.
For example:
* Use the **Email Composer Agent** to draft a follow-up or a nudging email
* Use the **Summarizer Agent** to turn form answers into key takeaways
* Use the **Business Case Agent** to generate tailored messaging from transcripts
Each Agent supports **custom prompts**, so you can guide the output.Example: *“*Compose a nudging email for the contact who did not view room that they are invited to*”*
### Step 4: Test, and enable
Once your workflow is ready:
1. Give it a clear name
2. Click **Save**
3. Run a test inside a room or connected CRM deal
4. Once you're confident, click **Enable**
💡 *You can always come back and edit it later.*
### Step 5: Review the output before it goes live
If your action involves AI-generated content (like an email), you can enable the **“Add to queue for review”** toggle.That way, the content will be added to your **Smart Queue** for final approval before anything gets sent or published.
**Smart Queue is where you'll see all your pending workflow drafts**: follow-ups, summaries, business cases, and more. Spend just a few minutes each morning reviewing and sending what matters, all without writing from scratch.
***
### What's next
Now that you've built your first workflow, explore more advanced options:
* [Triggers](/automations/triggers) - See all available trigger types
* [Actions](/automations/actions) - Explore the full list of workflow actions
* [AI Actions](/automations/ai-actions) - Learn more about AI-powered content generation
* [Suggested Recipes](/automations/suggested-recipes) - Browse pre-built workflow templates
### Step 3: Add an AI-agent (Optional)
If you want Flowla to generate personalized content for you, drop in an **AI Agent** before your action.
For example:
* Use the **Email Composer Agent** to draft a follow-up or a nudging email
* Use the **Summarizer Agent** to turn form answers into key takeaways
* Use the **Business Case Agent** to generate tailored messaging from transcripts
Each Agent supports **custom prompts**, so you can guide the output.Example: *“*Compose a nudging email for the contact who did not view room that they are invited to*”*
### Step 4: Test, and enable
Once your workflow is ready:
1. Give it a clear name
2. Click **Save**
3. Run a test inside a room or connected CRM deal
4. Once you're confident, click **Enable**
💡 *You can always come back and edit it later.*
### Step 5: Review the output before it goes live
If your action involves AI-generated content (like an email), you can enable the **“Add to queue for review”** toggle.That way, the content will be added to your **Smart Queue** for final approval before anything gets sent or published.
**Smart Queue is where you'll see all your pending workflow drafts**: follow-ups, summaries, business cases, and more. Spend just a few minutes each morning reviewing and sending what matters, all without writing from scratch.
***
### What's next
Now that you've built your first workflow, explore more advanced options:
* [Triggers](/automations/triggers) - See all available trigger types
* [Actions](/automations/actions) - Explore the full list of workflow actions
* [AI Actions](/automations/ai-actions) - Learn more about AI-powered content generation
* [Suggested Recipes](/automations/suggested-recipes) - Browse pre-built workflow templates